Table of Contents
- Overview
- 1. What’s New?
- 2. Accessing “My Inventories” and CIL Overviews
- 3. The New 3-Step CIL Upload Flow
- 4. Step 1 - Upload Chemicals
- 5. Step 1 - Input Methods Overview
- 6. Input Method 1 - Mobile App
- 7. Finalizing Mobile App Scans on Desktop
- 8. Input Method 2 - Excel Upload
- 9. Input Method 3 - Search in The BHive Database
- 10. Input Method 4 - Transfer from Previous Inventories
- 11. Input Method 5 - Search in My ChemStore
- 12. Avoiding Duplicate Chemicals
- 13. Publishing Chemicals
- 14. Step 2 - Add Chemical Details
- 15. Step 3 - Update Consumption and Stock
- 16. Viewing and Working with Your Inventory
- 17. Duplicate Detection
- 18. My ChemStore - Central Access to Chemical Records
Overview
The BHive has introduced a new, simplified way to upload and manage your Chemical Inventory List (CIL). This update is designed to:
- Centralize data access for inventories and ChemStore
- Reduce the upload flow to 3 easy steps
- Help you avoid duplicate chemicals
- Guide you to provide all mandatory information
- Make it easier to search and navigate your CIL
1. What’s New?
Centralized Chemical Management
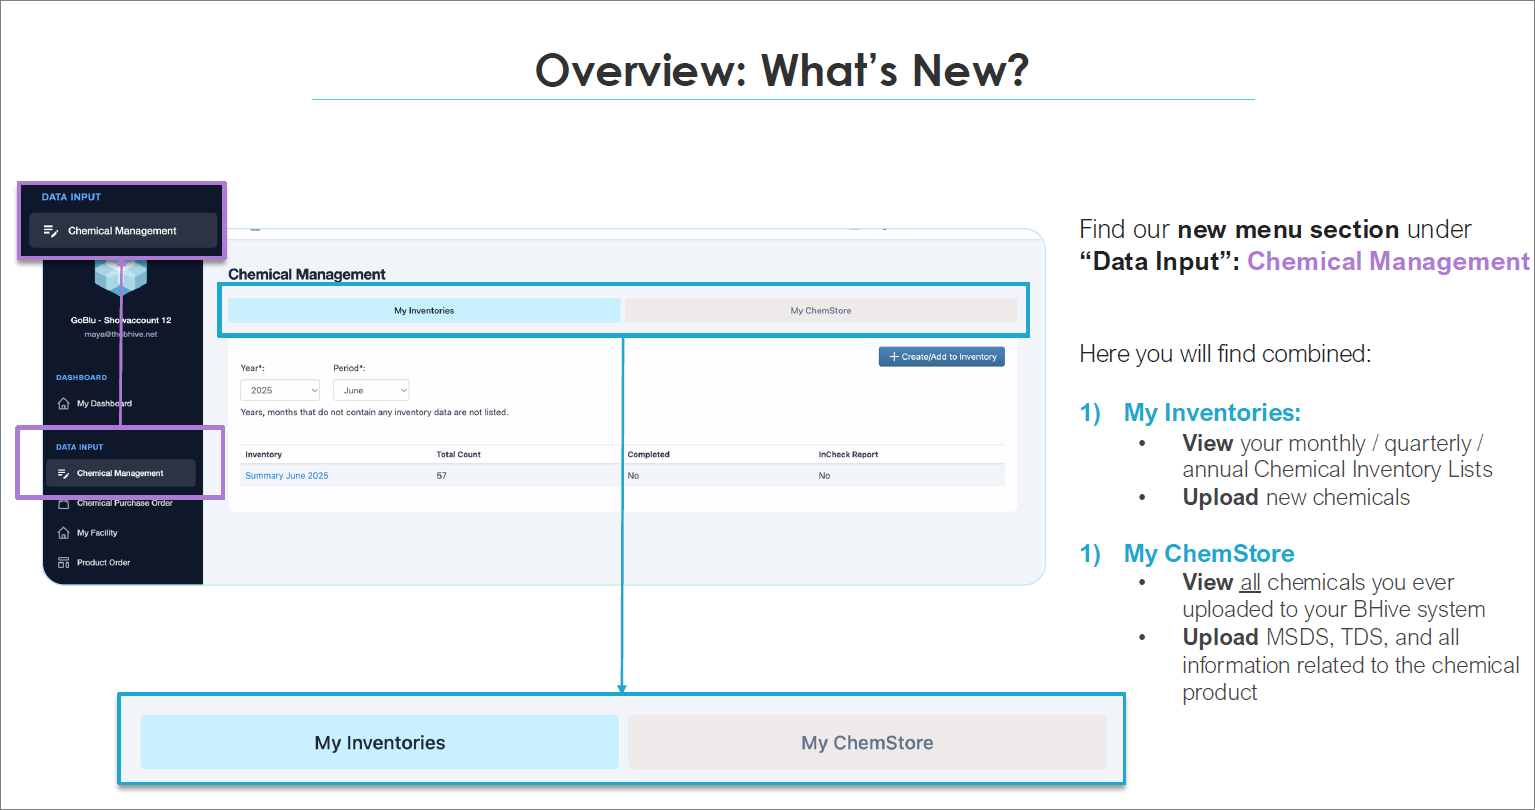
ChemStore and Inventory data are now combined under one main menu:
- Menu path:
Data Input→Chemical Management - Under Chemical Management, you will find:
- My Inventories – view and upload your monthly/quarterly/annual CILs
- My ChemStore – view all chemicals ever uploaded to your BHive system and manage related documentation
Key Improvements
- Easy data access
Access both ChemStore and Inventory under a single section: Chemical Management. - Simplified 3-step upload flow
The upload process is reduced to three clear steps:- Upload chemicals
- Add chemical details
- Update consumption & stock
- Duplicate prevention
- View previously added chemicals while uploading new ones.
- The system will flag potential duplicates with a Duplicate Alert.
- Guidance on mandatory data
- The system highlights missing mandatory information.
- Status indicators show if entries are complete or incomplete.
- Improved CIL navigation
- New search function in the inventory summary to quickly find chemicals.
2. Accessing “My Inventories” and CIL Overviews
Navigating to My Inventories
- Go to Data Input → Chemical Management → My Inventories.
- Use the Year and Period (Month) selectors to choose the inventory period you want to view.
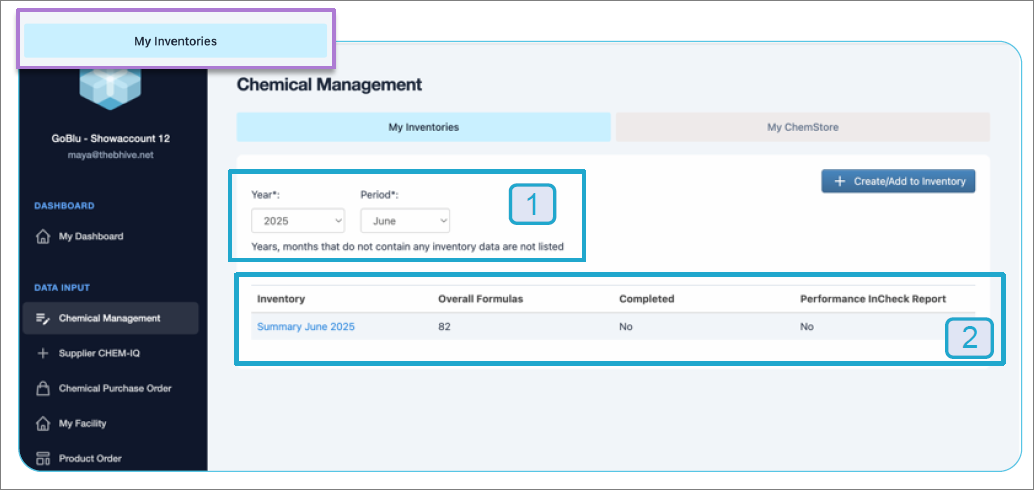
In the Inventory Summary for a given month, you can see:
- Overall Formulas – total number of chemical products uploaded for that period
- Completed – whether that month’s CIL is marked as complete
- Performance InCheck Report – whether an InCheck report has been generated (visible only if you have an active InCheck subscription)
Note: Months with no data are not listed.
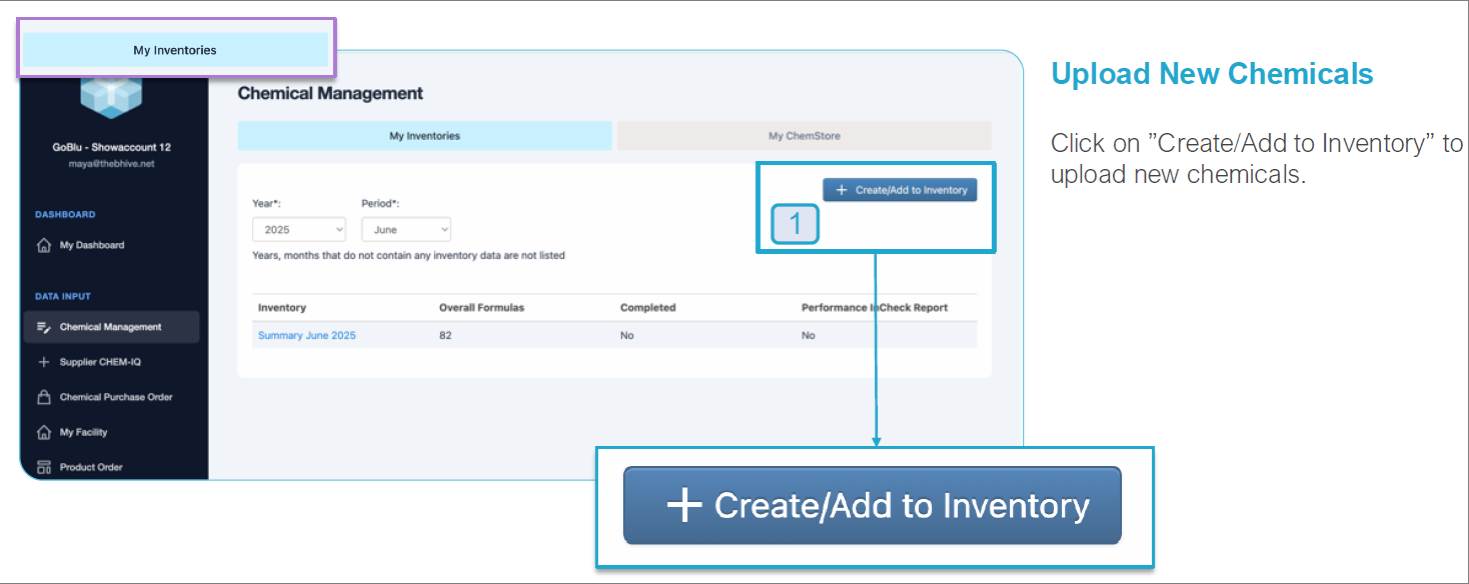
To upload new chemicals, click + Create/Add to Inventory.
3. The New 3-Step CIL Upload Flow
The new flow consists of three main steps:
- Upload chemicals
- Add chemical details
- Update consumption & stock
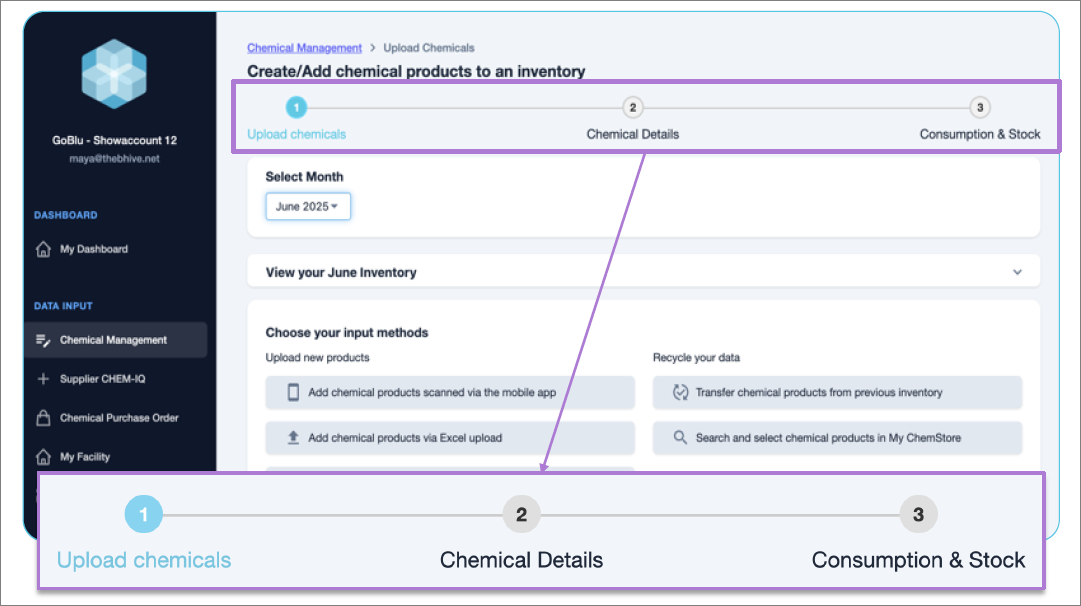
4. Step 1 – Upload Chemicals
From My Inventories, click + Create/Add to Inventory to open the upload flow, then:
- Select the month in which you want to upload chemicals.
- Check if you already uploaded chemicals in that month, to avoid duplicates.
- Choose the desired input method to add chemicals.
- Review newly added chemicals in the Inventory – Pending Chemicals table.
- Click Publish to finalize and add them to your inventory.
When and Which Chemicals to Upload
Best practice guidance:
- Which chemicals should you upload?
- Upload all chemicals available in your factory for a full data insight.
- This does not negatively affect your performance: in Step 2, you specify General Usage Type, and out‑of‑scope chemicals are automatically excluded from performance evaluation.
- When should you upload?
- Industry practice is to update data monthly (confirm with brand partners for specific requirements).
- Recommended upload window:
- June CIL: upload between 01.06 – 15.07
- July CIL: upload between 01.07 – 15.08
- August CIL: upload between 01.08 – 15.09 (as per pattern shown)
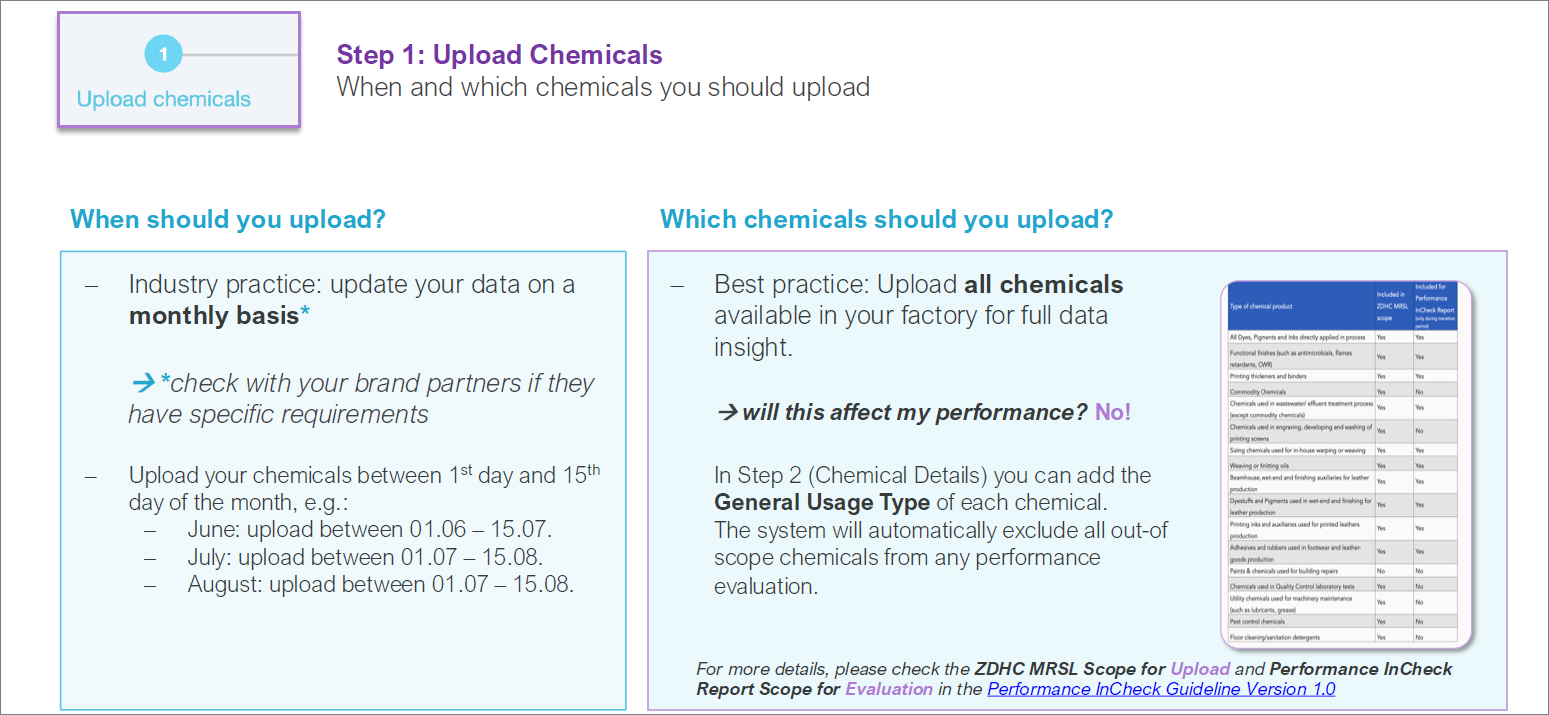
For more details, refer to:
- ZDHC MRSL Scope for Upload
- Performance InCheck Guideline v1.0 (Performance InCheck Report Scope for Evaluation)
5. Step 1 – Input Methods Overview
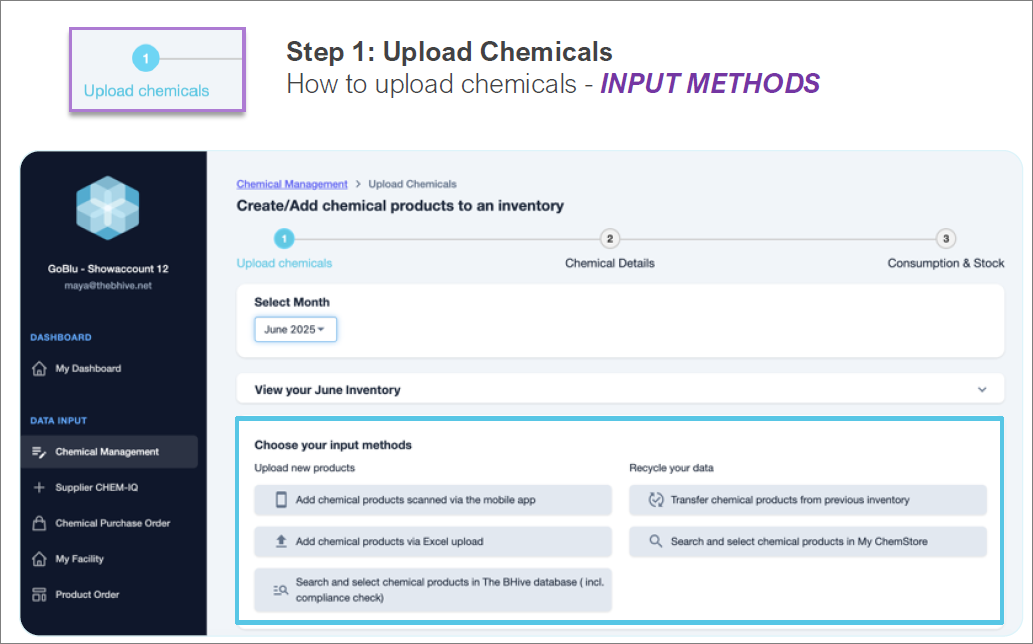
There are five input methods to upload chemicals:
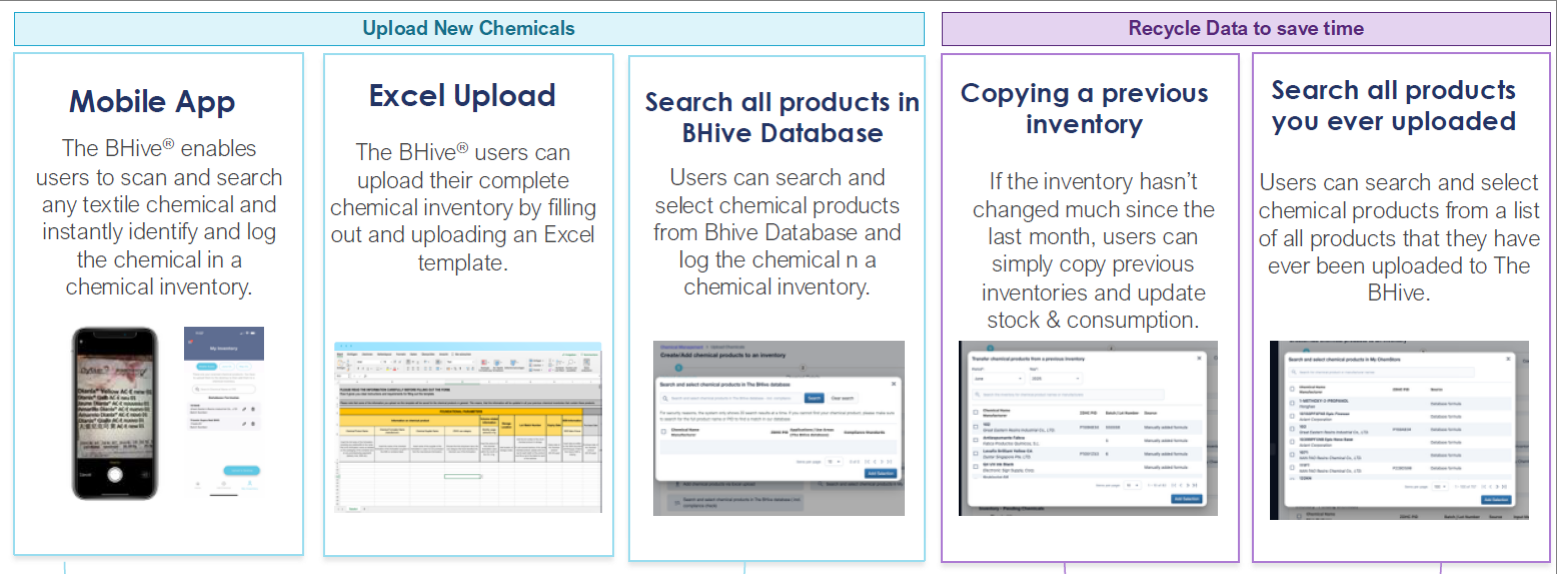
- Mobile App (scan)
- Excel Upload
- Search in The BHive Database (incl. compliance check)
- Transfer from previous inventories
- Search and select from My ChemStore
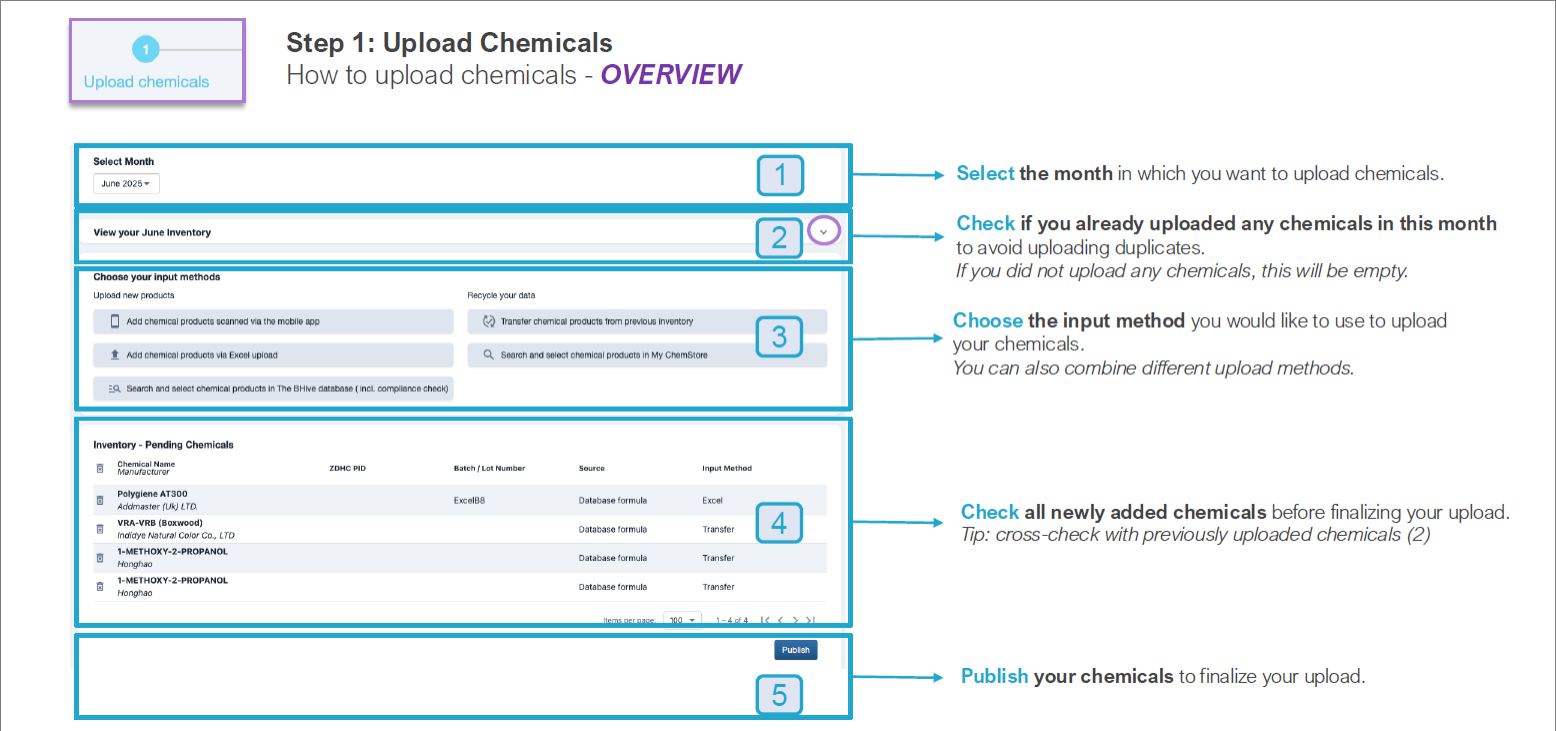
Before publishing:
- Check all newly added chemicals.
- Cross-check for duplicates against previously uploaded entries.
- Use Publish to finalize.
6. Input Method 1 – Mobile App
The BHive® Mobile App lets you scan and search chemicals directly in storage and log them into your inventory.
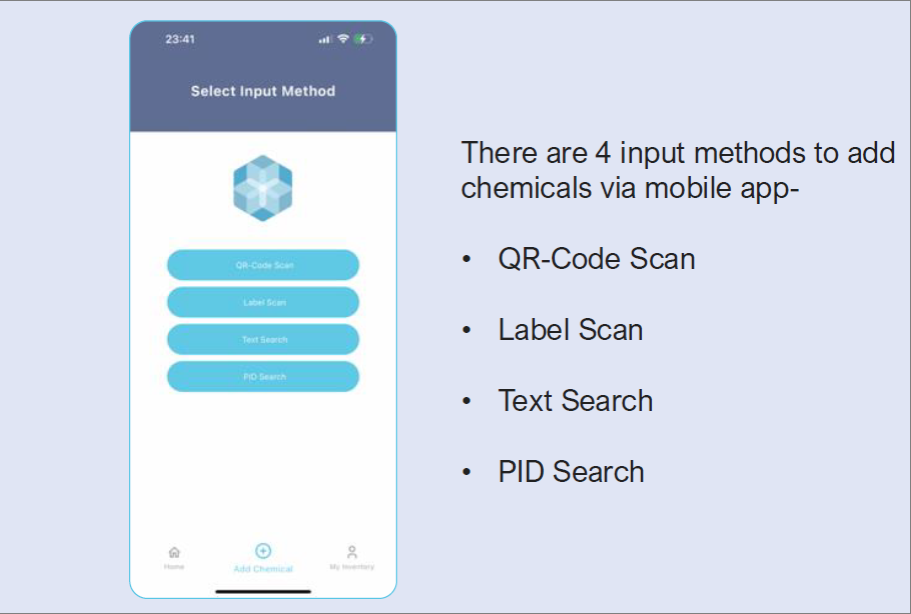
Mobile app input methods:
- QR-Code Scan
- Label Scan
- Text Search
- PID Search
Tip: Use the mobile app when you are physically in the storage room and want to scan labels/QR codes directly from product containers.
QR-Code Scan
- On the app, choose QR-Code Scan to open the camera.
- Point the camera at the chemical’s QR code.
- The app reads the code and displays matching chemicals.

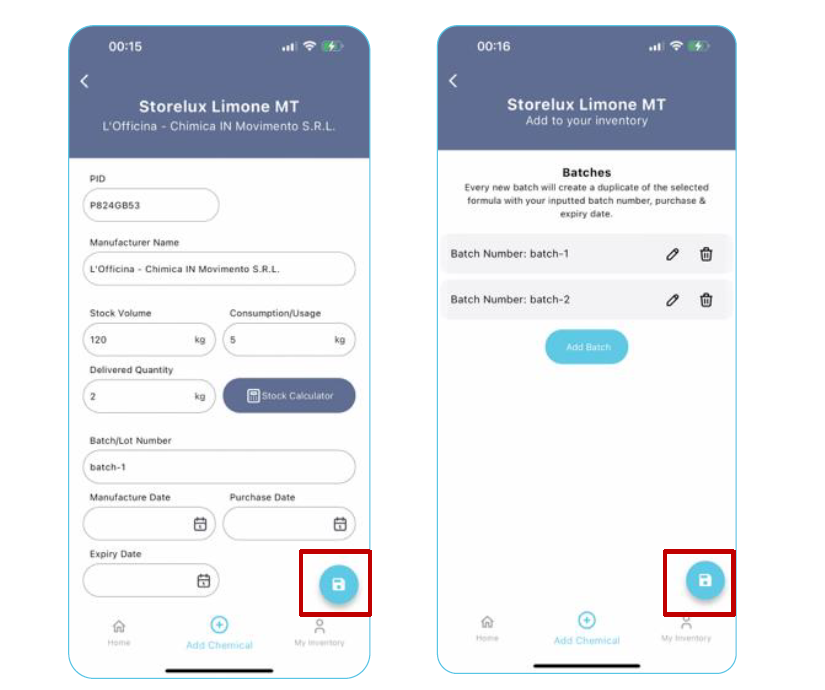
- If a matching chemical is found:
- Select the correct chemical.
- Enter the required details and tap Save.
- Add batch information (e.g., batch number, dates) on the next screen.
- Tap Save again to add the batch(es).
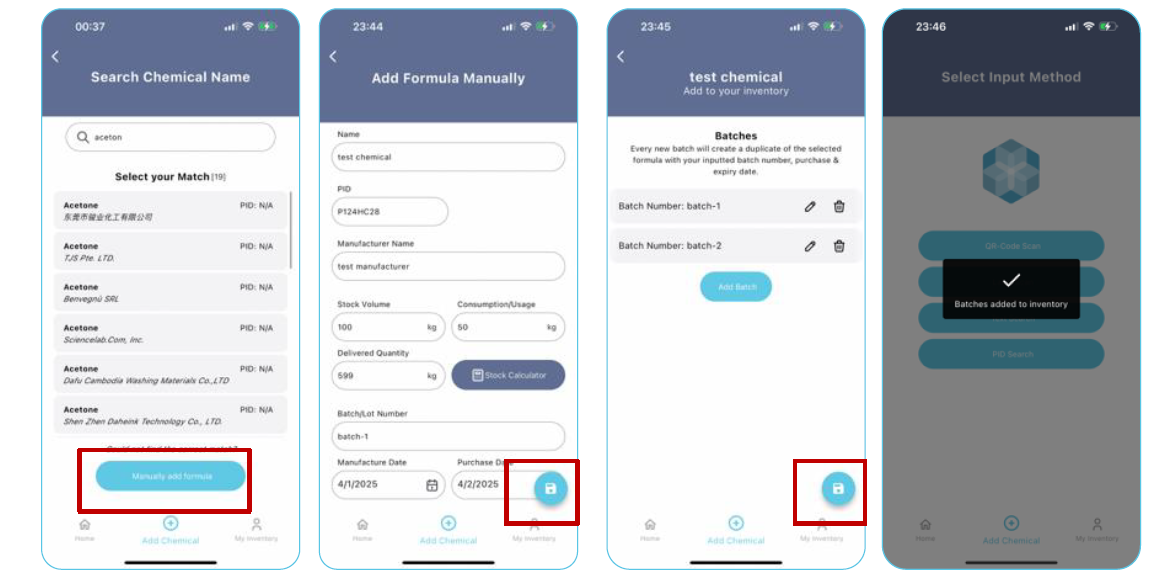
- If a matching chemical is not found:
- Tap Try Text Search to search manually.
- If still not found, tap Manually Add Formula, fill the chemical data, and save.
- Then add batch details and save again.
Label Scan
- Choose Label Scan to open the camera.
- Point it at the product label.
- The app will read the label text and propose matches.
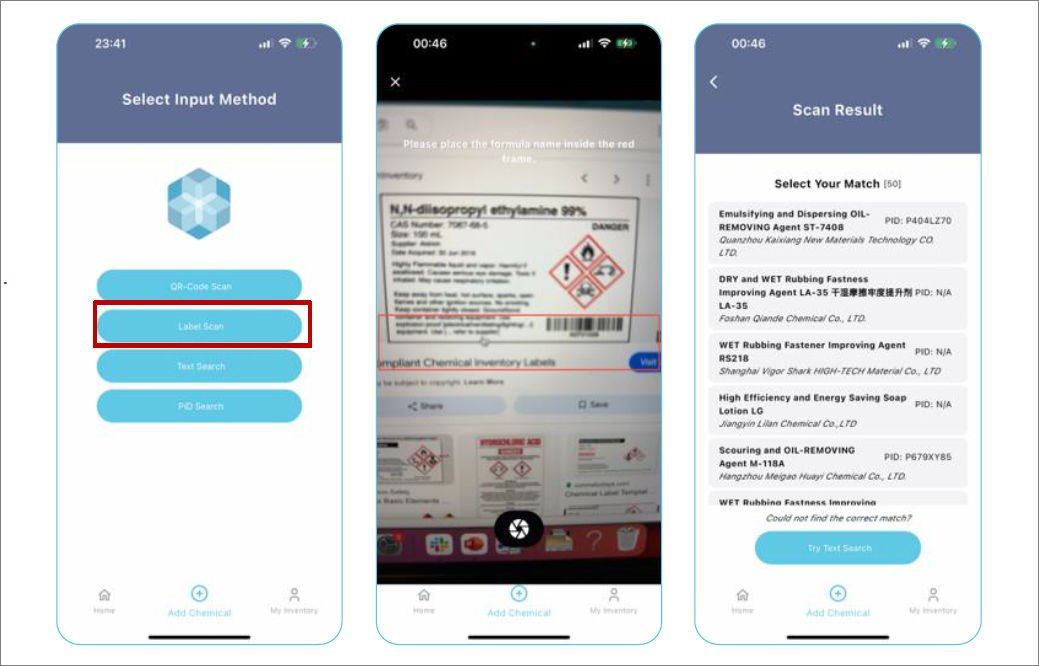
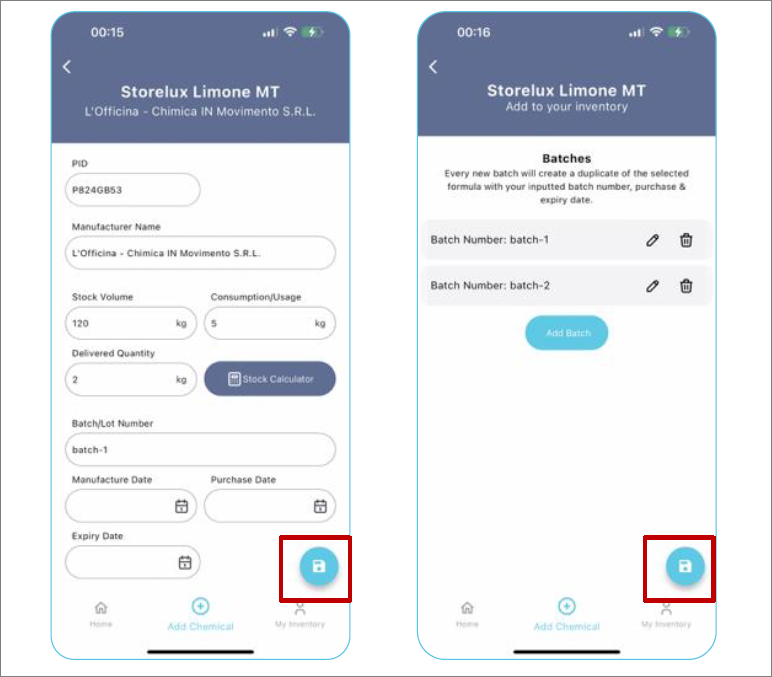
- If the chemical is found:
- Select the correct product, fill required fields, save, then add batches.
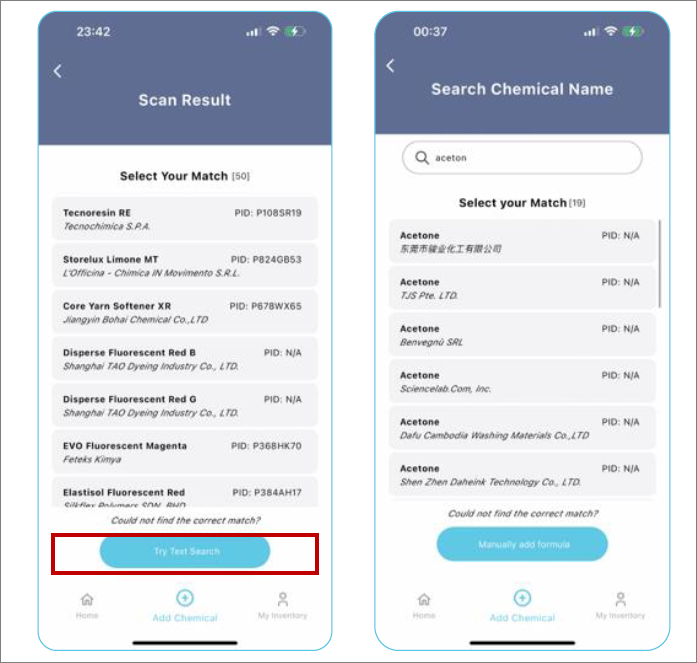
- If not found:
- Tap Try Text Search and follow the same pattern as with QR code.
- If still not found, use Manually Add Formula, then add batch details and save.
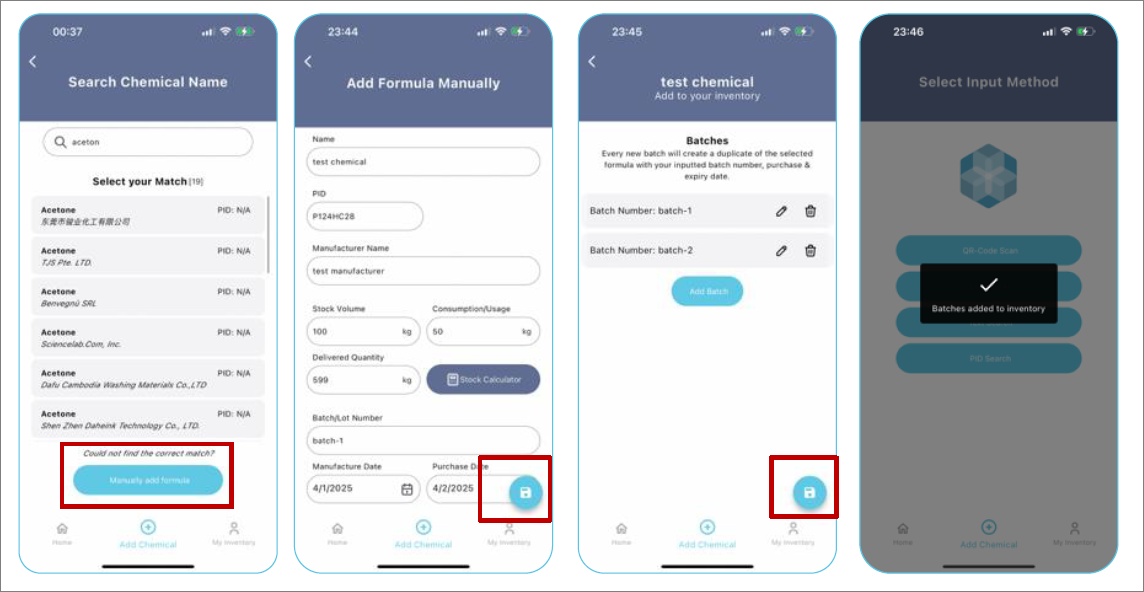
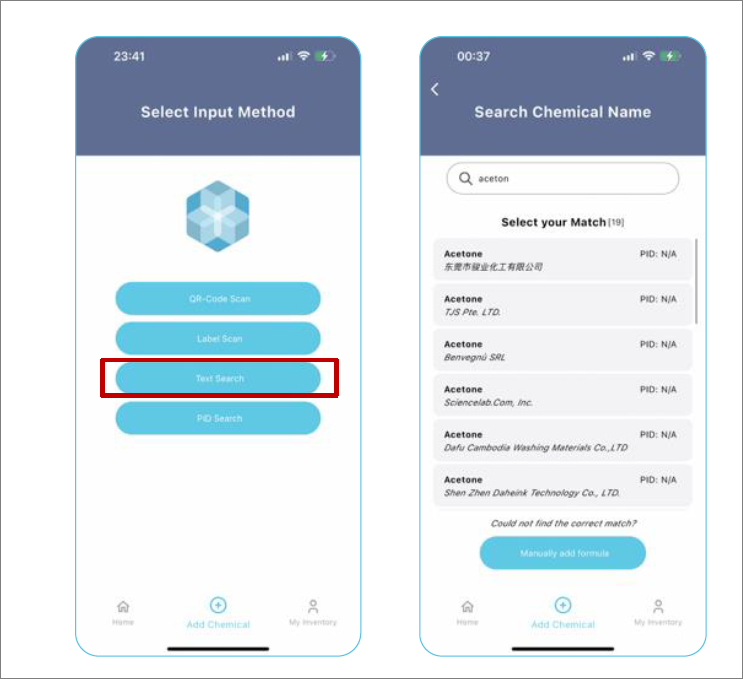
Text Search
- Choose Text Search.
- Type the chemical name.
- If matched, select the correct chemical, fill the required fields, and save.
- Add batch details on the next screen and save again.
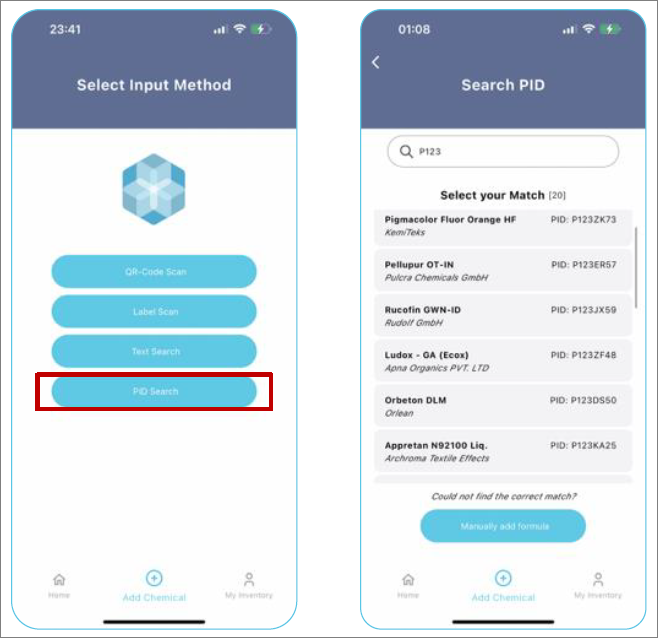
PID Search
- Choose PID Search.
- Enter the PID of the chemical.
- If matched, select the correct product, add required details, and save.
-
Add batch details and save again.
7. Finalizing Mobile App Scans on Desktop
After scanning chemicals via the mobile app:
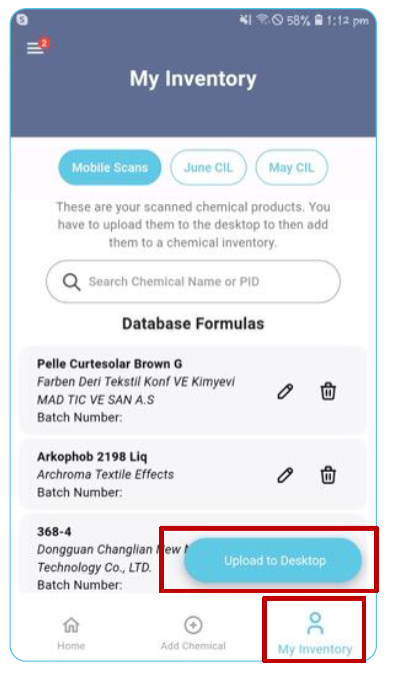
- Open My Inventory in the mobile app and upload the scans to the desktop.
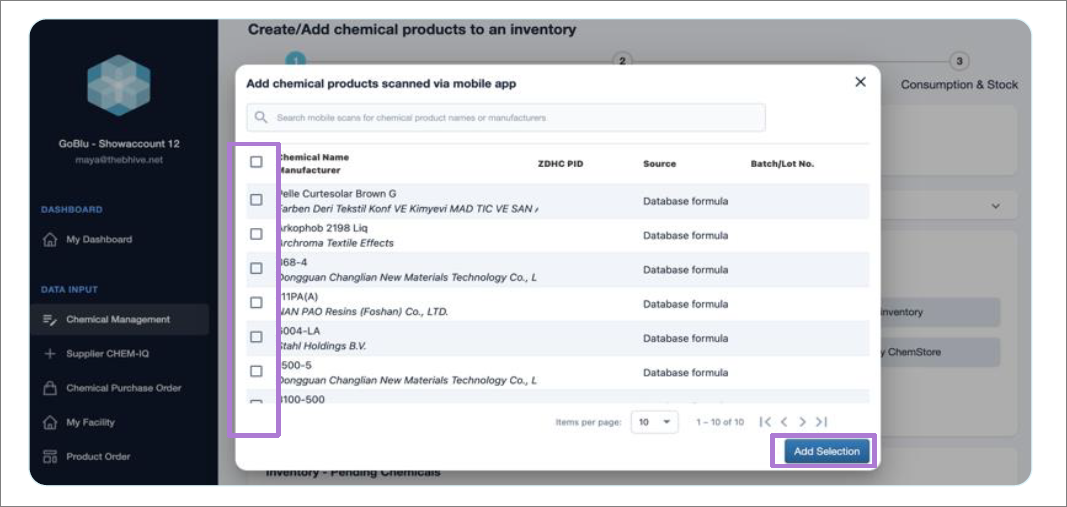
- On the desktop, in Step 1, choose Add chemical products scanned via mobile app.
- Review the Mobile Scans list.
- Select the chemicals you want to add.
- Click Add Selection to move them to Inventory – Pending Chemicals.
8. Input Method 2 – Excel Upload
The Excel Upload is recommended when you want to upload many products together, including details and consumption/stock information.
Download and Fill the Template
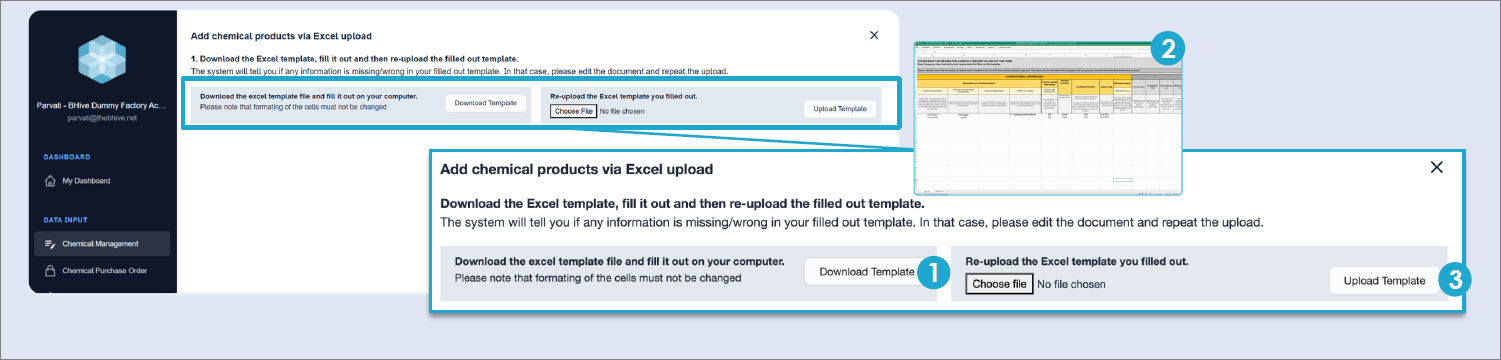
- In Step 1 on desktop, select Add chemical products via Excel upload.
- Click Download Template to get the Excel file.
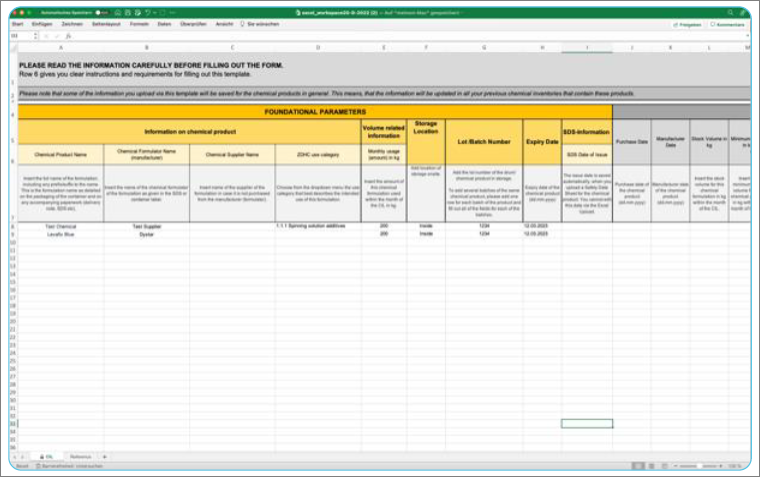
- Fill out the template on your computer, following the instructions in row 7.
Important notes:
- This template follows the ZDHC CIL template structure.
- Do not change any cell formatting.
- Read instructions in row 7 carefully to ensure the system can interpret your data.
- Minimum required fields:
- Chemical Product Name
- Chemical Formulator Name (manufacturer)
- You do not need to fill all columns; fill what is required by your organization/brands.
- If you add ZDHC PID, matching with the BHive database becomes easier.
- When a product already exists in BHive, uploaded chemical detail information will also update previous inventories.
Upload and Fix Errors
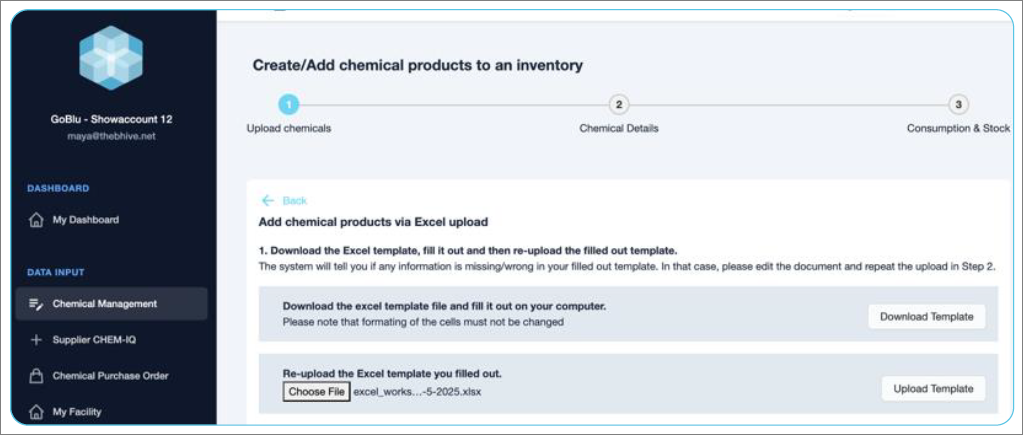
- Select the filled Excel file via Choose File, then click Upload Template.
- If you previously uploaded a template, you may see a warning about overwriting data.
- The system will highlight any errors (e.g., missing or incorrect data).
- Correct the errors in your Excel file and re-upload until there are no errors.
Database Matching
After a successful upload:
- The system attempts to match your chemicals with The BHive database.
There are two tabs:
- Unmatched Results
- Chemicals that could not be matched directly.
- Color indicators:
- Green product name, red manufacturer name → product name found, manufacturer not found.
- Red product name and manufacturer → no match for either.
- In the Database Match column:
- Click Correct the match to search and select a correct database entry.
- If no match is found, click Manually Add Formula.
- Matched Results
- Chemicals that have been successfully matched (either with the database or added manually).
- You can Unmatch if there is a mistake.

Once all matches are correct, click Add Matched Chemicals to move them to your Chemical Inventory Preview.
9. Input Method 3 – Search in The BHive Database
Use this method to access BHive database information and compliance status directly:
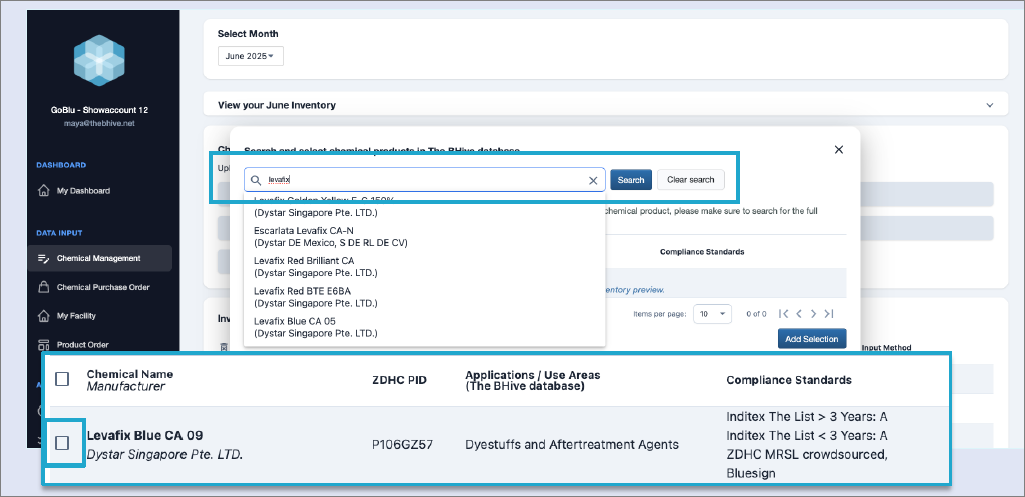
- Choose Search and select chemical products in The BHive database (incl. compliance check).
- Enter the chemical name (try different spellings if necessary).
- Select the correct match, reviewing:
- ZDHC PID (if available)
- Compliance standards (e.g., ZDHC MRSL, Inditex The List, bluesign)
- Click Add Selection to add the chemical to your pending inventory.
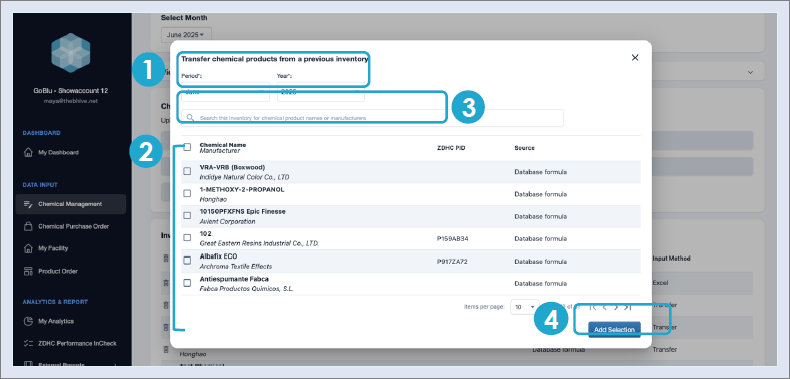
10. Input Method 4 – Transfer from Previous Inventories
Use this when your inventory has not changed significantly from one month to the next:
- Open the Transfer from previous inventory input method.
- Select the month/year from which you want to copy chemicals.
-
Select chemicals:
- Check individual boxes to select specific products, or
- Use the top checkbox to select all chemicals on the current page.
Note: The top checkbox only selects items on the current page. If your data spans multiple pages, repeat the selection on each page.
- Optionally use the search bar to find specific chemicals.
- Click Add selection to inventory.
11. Input Method 5 – Search in My ChemStore
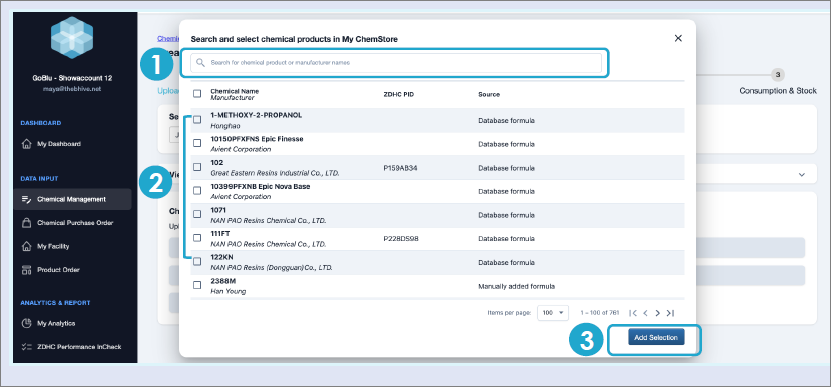
My ChemStore is your own chemical “encyclopaedia” within The BHive:
- It lists all chemical products you have ever uploaded.
- Products are shown alphabetically.
To use it as an input method:
- Choose Search and select chemical products in My ChemStore.
- Type a chemical product name or manufacturer name.
- Select the matching products from the result list.
- Click Add selection to inventory.
12. Avoiding Duplicate Chemicals
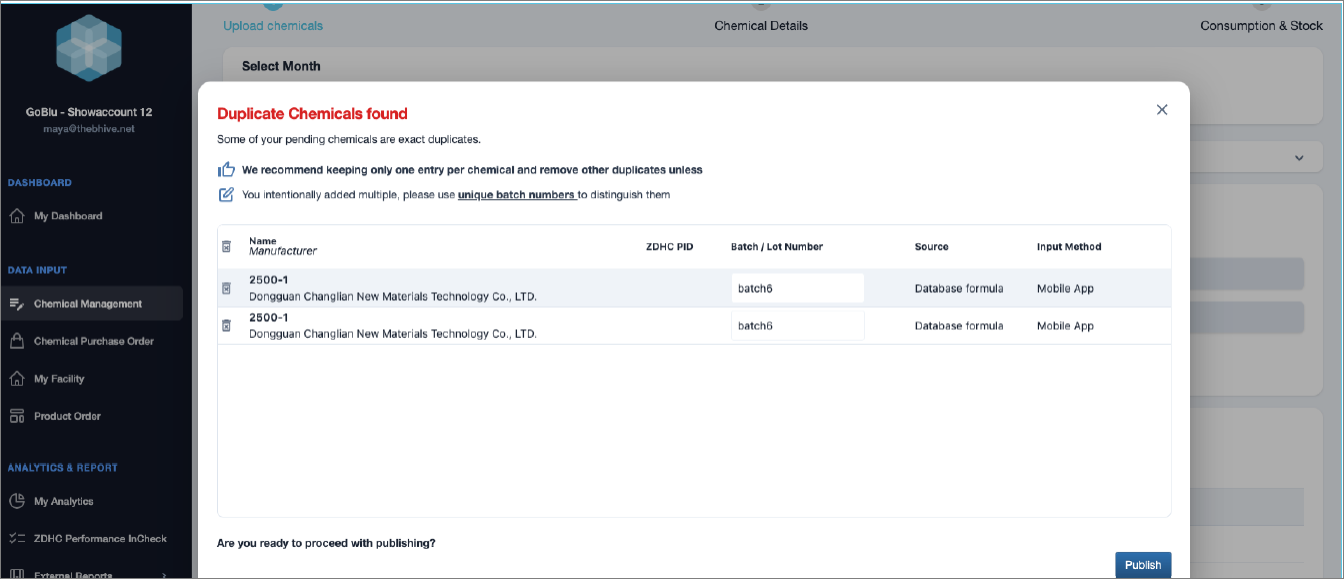
Before publishing, the system checks for potential duplicates:
- If duplicates are detected, a Duplicate Chemicals found alert appears.
- You’ll see pairs of seemingly identical records (same name, manufacturer, batch, etc.).
- Recommendation:
- Keep one entry per chemical.
- Delete duplicates unless you intentionally added multiple entries (and in that case use unique batch numbers to distinguish them).
13. Publishing Chemicals
Once you have reviewed your pending chemicals:
- You can delete single entries using the trash bin icon.
- To delete all entries, click the trash bin icon next to Chemical Name.
- When ready, click Publish.
- Confirm the action when prompted.
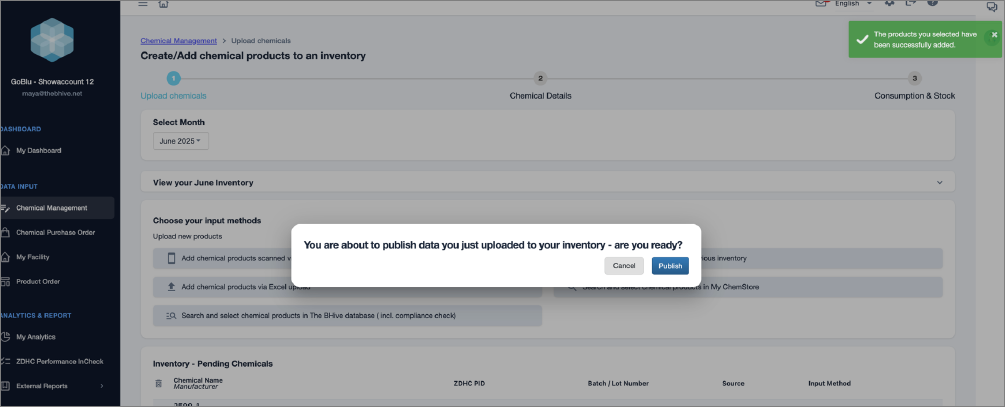
Publishing moves the chemicals into your CIL and you can then proceed with:
- Step 2: Add Chemical Details
- Step 3: Update Consumption & Stock
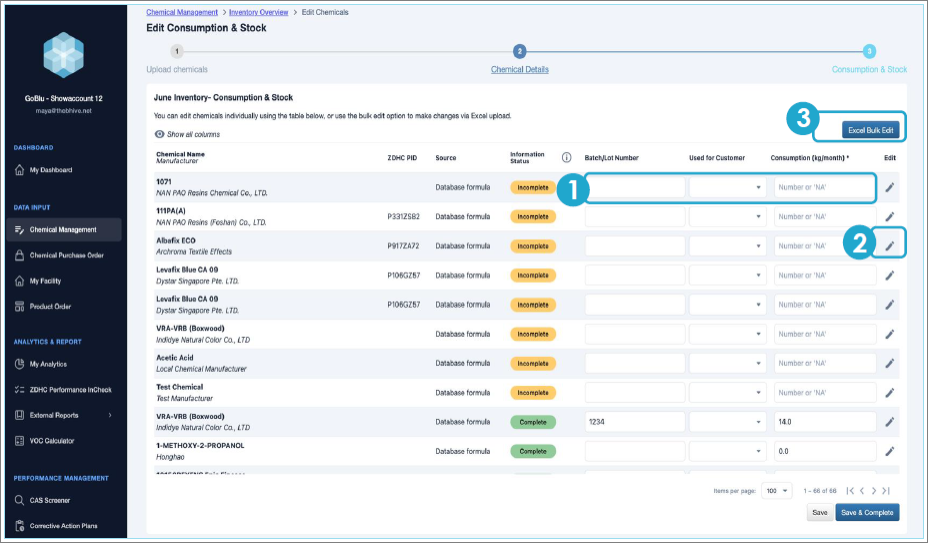
14. Step 2 – Add Chemical Details
In Step 2, you provide additional information required for each chemical.
Navigation:
- Go to Chemical Management → Inventory Overview → Edit Chemicals, then switch to the Chemical Details step.
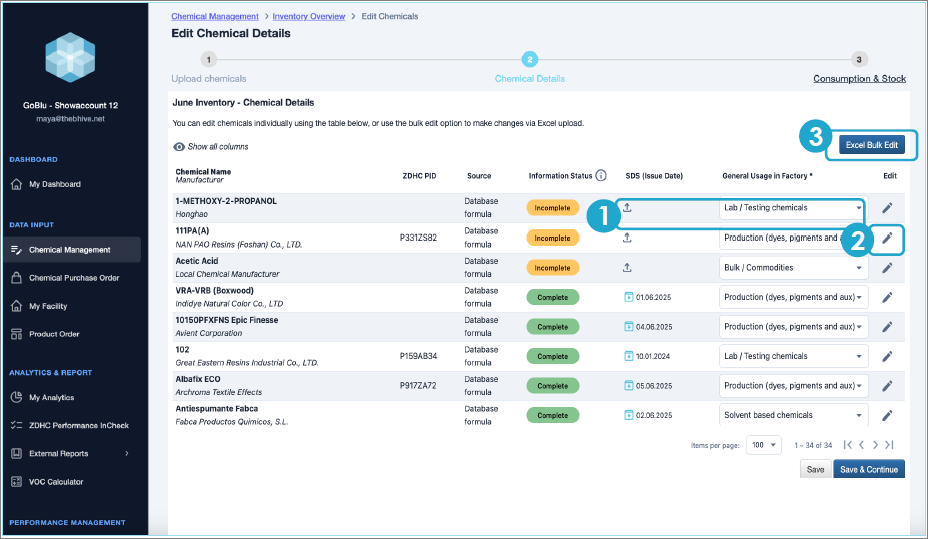
Key points:
- The Information Status column shows whether a chemical is Complete or Incomplete.
- All BHive users must at least provide:
- General Usage in Factory.
- Some brands require SDS upload; for those, SDS fields become mandatory.
Ways to add/edit details:
- Directly in the table (mandatory fields only).
- Click Edit for a chemical to open more fields.
- Use Excel Bulk Edit to update details for multiple chemicals via Excel.
The system always lists incomplete chemicals at the top for easier completion.
15. Step 3 – Update Consumption and Stock
In Step 3, you enter or update consumption and stock data.
Navigation:
- From Inventory Overview, go to Edit Chemicals and switch to Consumption & Stock.
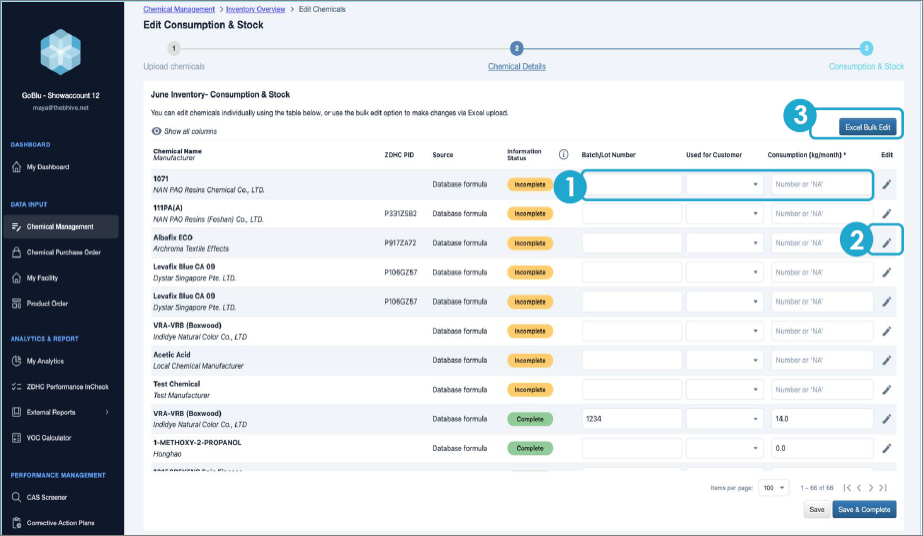
Key points:
- All BHive users must enter at least:
- Consumption (kg/month) (or NA where applicable).
- Check with your organization, partners, and customers for any further mandatory fields.
- Information Status indicates whether consumption/stock data is complete.
Ways to add/edit data:
- Enter values directly in the table.
- Click Edit to fill more fields for a specific chemical.
- Use Excel Bulk Edit for bulk updates via Excel.
When all mandatory fields are complete:
- Click Save & Complete.
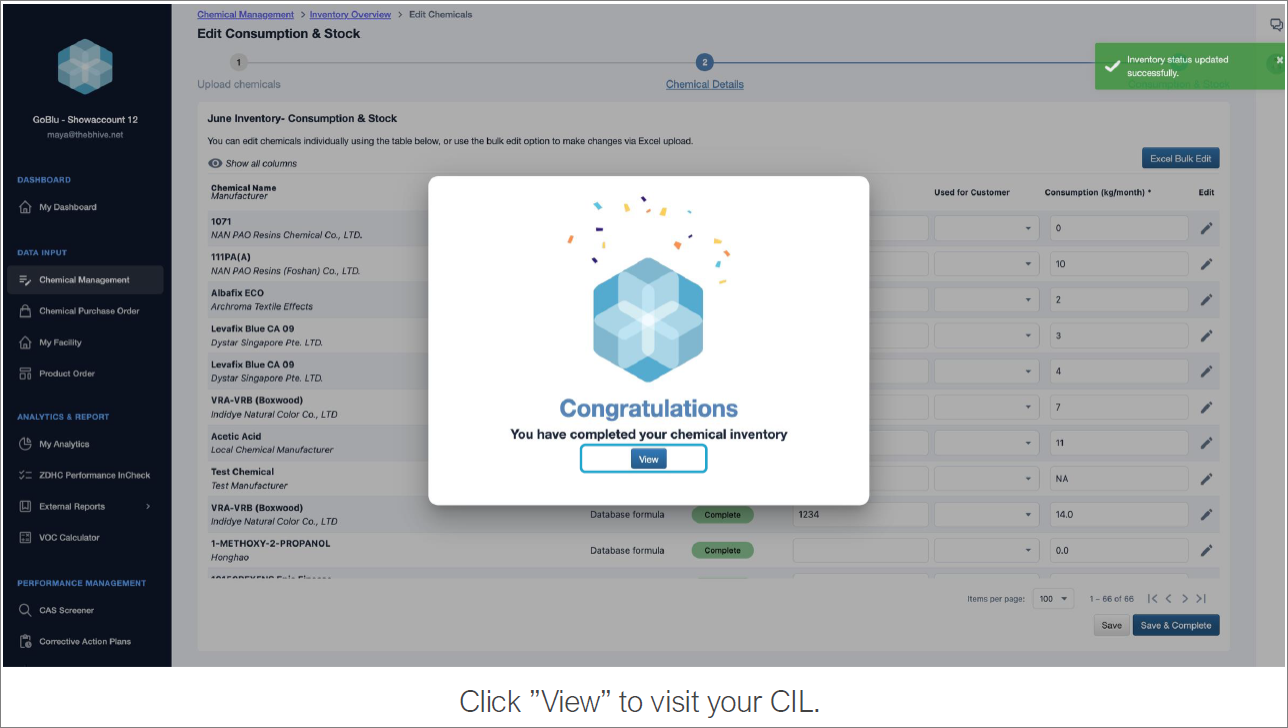
16. Viewing and Working with Your Inventory
Once your inventory is complete:
- Go to Chemical Management → Inventory Overview.
- Open the Chemical Inventory Summary for the month (e.g., June 2025).
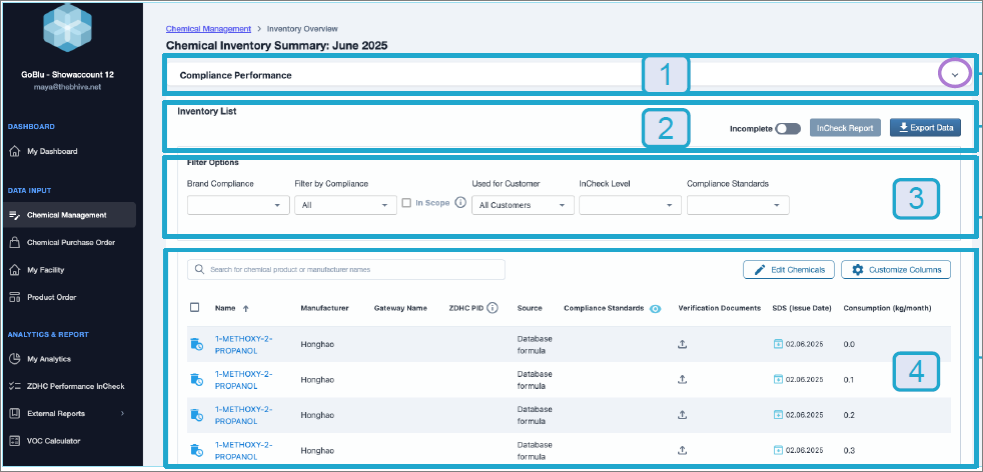
On this screen you can:
- Check Compliance Performance.
- Filter by:
- Brand compliance
- Compliance standards
- Used for Customer
- InCheck Level
- Search for chemicals by product or manufacturer name.
- Edit chemicals again using Edit Chemicals.
- Export data to Excel.
- Use the search bar inside the CIL to quickly find specific entries.
17. Duplicate Detection
Once an inventory is published, use duplicate detection to identify and manage duplicate entries directly within the inventory overview.
Duplicate detection is based on the chemical name, manufacturer, and the batch number.
Select the Show Unique Batches check box to switch between showing all entires or unique batches only.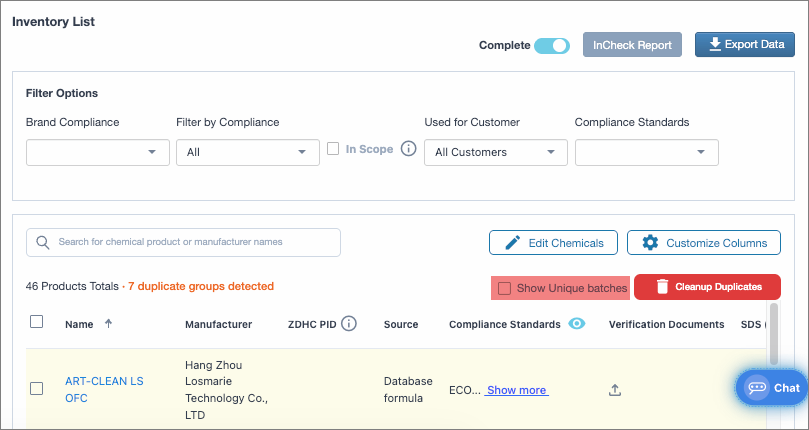
How to remove duplicates
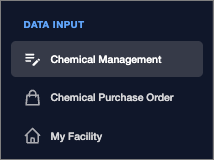
- To access duplicate detection, select Chemical Management from the left-hand navigation menu.
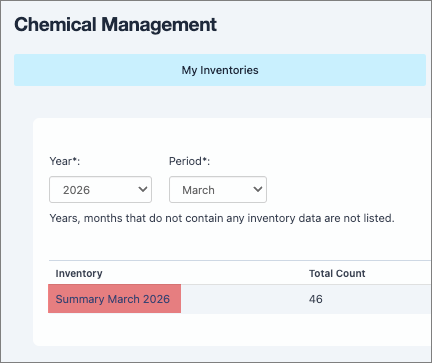
- On the Chemical Management page, select the appropriate inventory you want to check for duplicates.
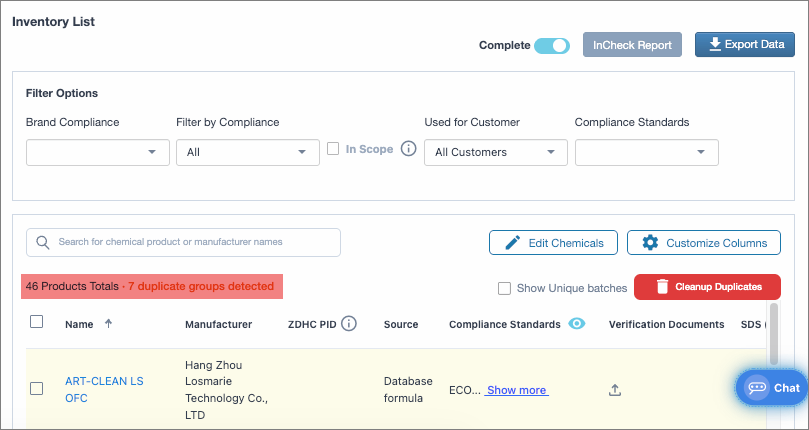
- On the Chemical Inventory Summary page, scroll down to the Inventory List. In this example, notice there are 7 duplicate groups detected.
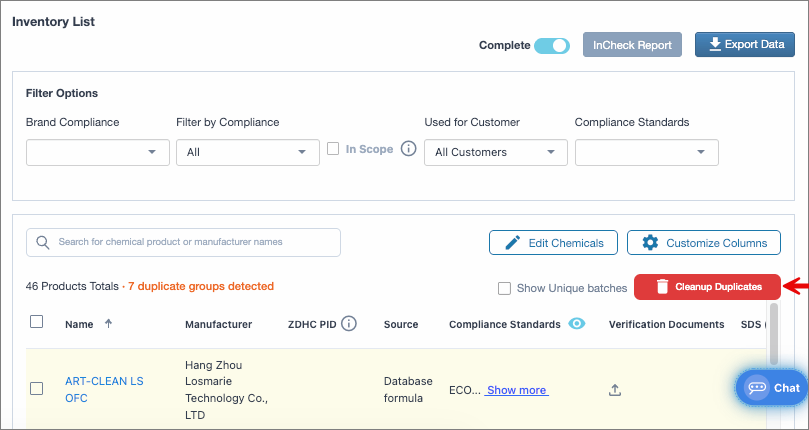
- Select Cleanup Duplicates.
- This reveals the Clean Up Duplicates page, where you can select which groups to clean up. Each blue header indicates a duplicate entry. In the screenshot below, there are 7 groups of duplicate entries.
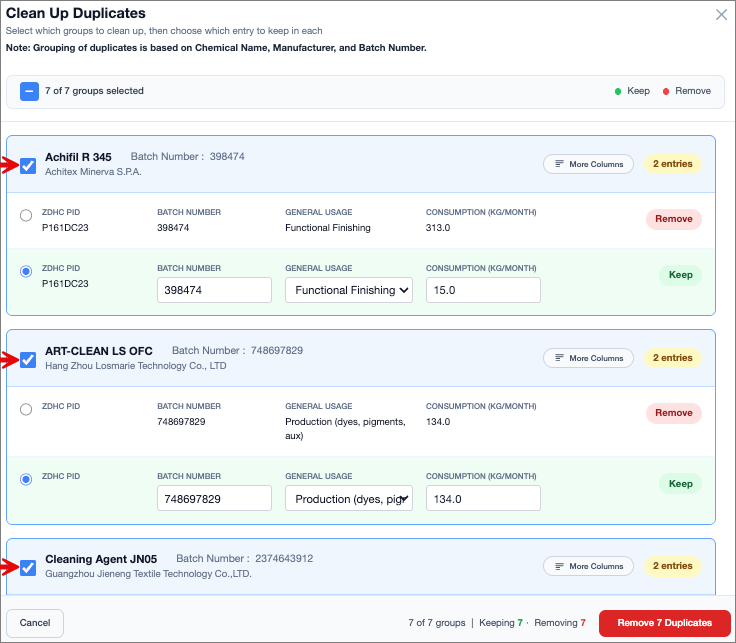
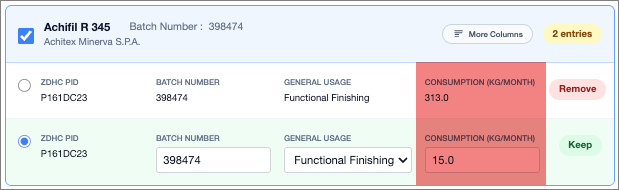
- In each group, review each field to identify which entry is correct.
- In this example, all fields are the same except Consumption.
- In this example, all fields are similar.
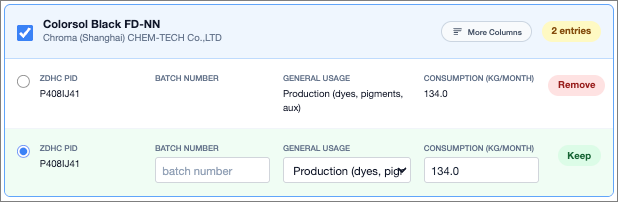
- In this example, all fields are the same except Consumption.
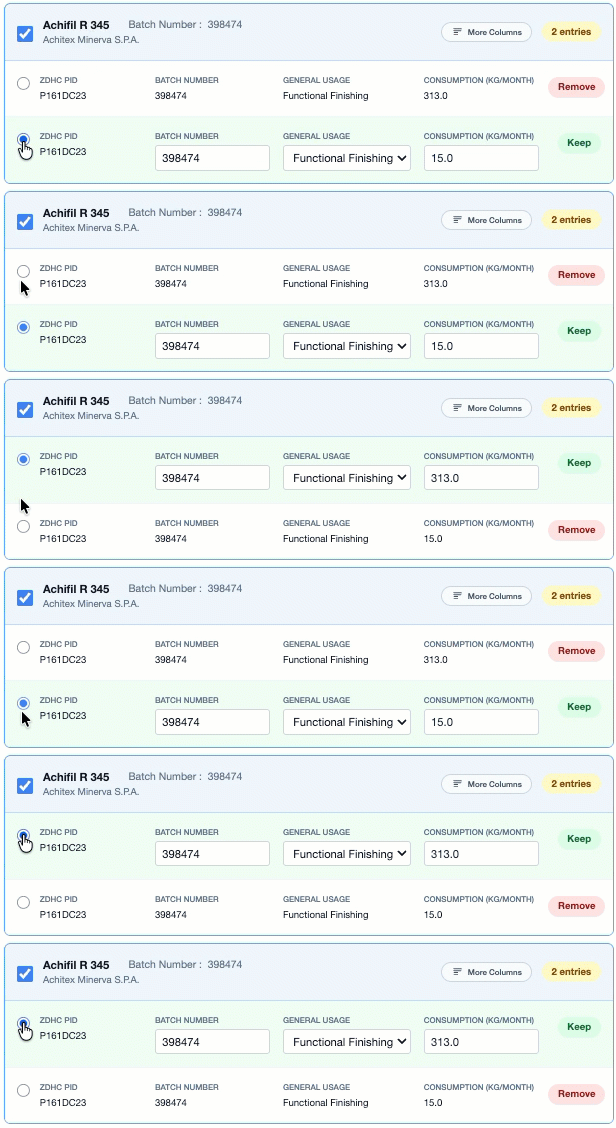
- Once you've verified which entry to keep, select the radio button next to the appropriate entry. Notice how the labels on the right side indicate which entry you will Keep or Remove.
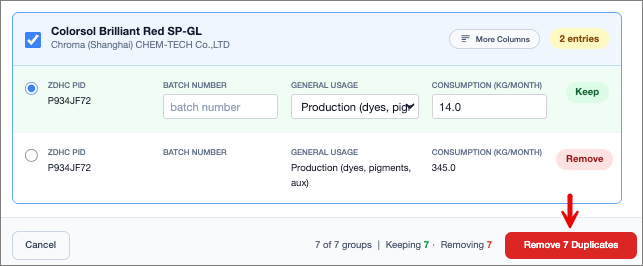
- Repeat for all remaining groups. Once you're done, select Remove 7 duplicates.
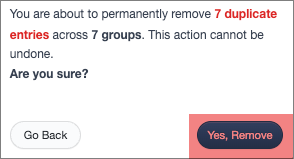
- In the pop-up window, select Yes, Remove to permanently remove the duplicate entries. Please note that this action cannot be undone.
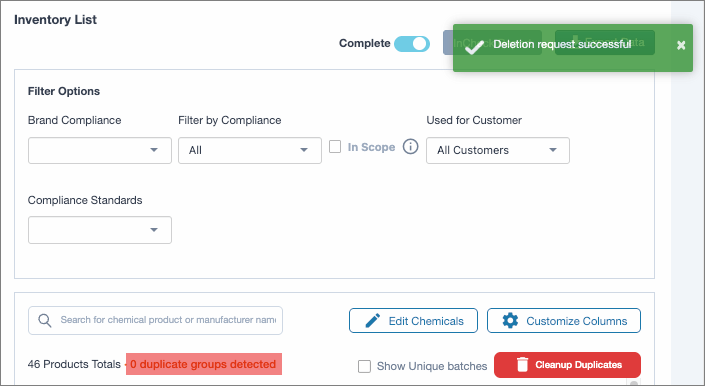
- You'll know you're successful if you see the Deletion request successful message. The Inventory List will also update to show 0 duplicate groups detected.
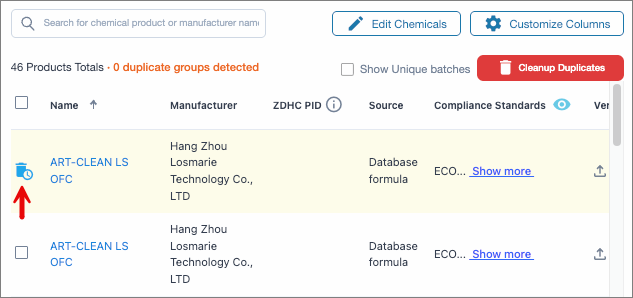
- The removed entries will show a trashcan icon next to the Name.
System selection logic
The system will use the following logic when removing duplicates automatically:
- The chemical with the most complete information within the group is selected.
- If multiple chemicals share the same level of information, the most recently updated entry is selected.
- If entries are still equal, the chemical linked to the highest number of "Used for Customer" and/or "Fabric Roll ID" entries is preferred.
Additional information: Chemicals with different batches are considered as different chemicals. Once duplicates are cleaned up, adding a new entry with a different batch number resolves the duplication. The batch number is part of what makes each chemical record unique.
18. My ChemStore – Central Access to Chemical Records
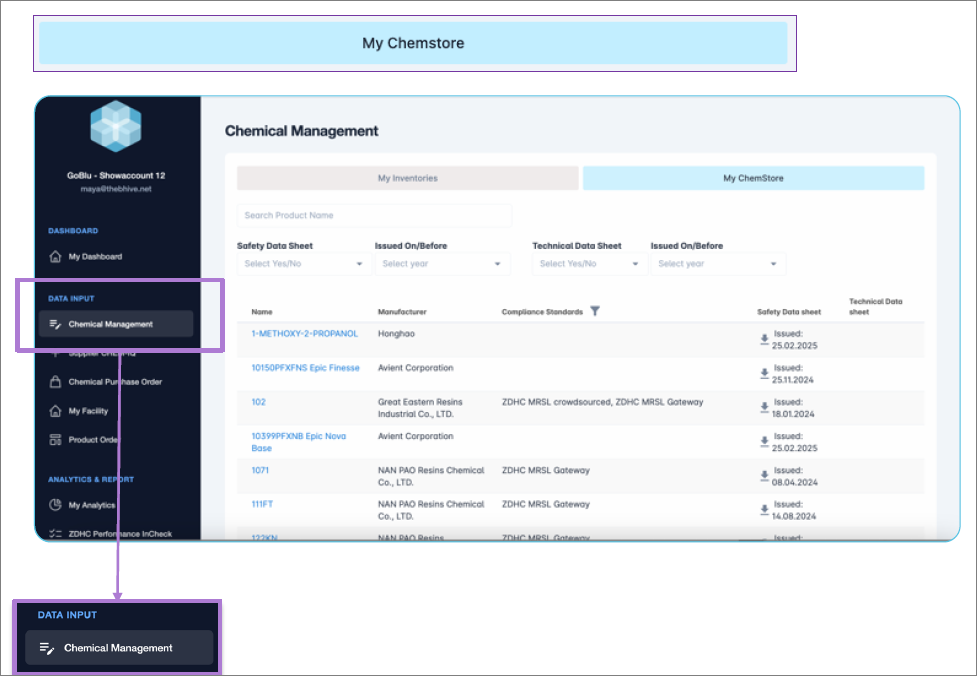
My ChemStore is now accessible under:
-
Data Input→Chemical Management→ My ChemStore
From My ChemStore you can:
- View all chemicals that have ever been uploaded to your BHive account.
- Filter chemicals by:
- Safety Data Sheet (SDS): presence and issue date
- Technical Data Sheet (TDS): presence and issue date
- Other filters (e.g., compliance)
- Click on a chemical to:
- Upload or update SDS/TDS documents.
- Review compliance information.
- Use it as a source when uploading to inventories (via Input Method 5).